
If a storm has whipped through or you’ve just spotted a cracked tile from the driveway, don’t panic. Replacing a few damaged tiles is one of the most common roofing jobs, and with the right approach it can be handled safely and neatly. This guide walks you through how to replace broken roof tiles, so you know when it’s a simple DIY fix and when it’s time to call in the professionals at LD Roofing Services Ltd.
We’ll also weave in practical tips from on-the-roof experience, outline the right tools and safety steps, and finish with guidance for those who’ve recently gained a roofing qualification and want to sharpen their technique on live jobs.
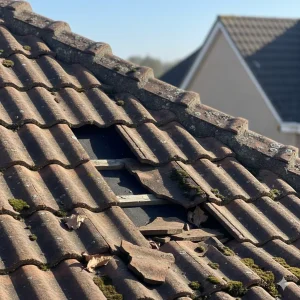
First things first: is DIY right for you?
Before you even fetch a ladder, take a step back and assess.
- Access and height:. Single-storey bungalows or low extensions are usually more manageable for competent DIYers. Steeper or higher roofs demand professional access equipment and training.
- Number of broken tiles: One or two isolated tiles is one thing. A run of damage across a valley or ridge may point to a wider issue.
- Tile type: Interlocking concrete and standard clay tiles are fairly straightforward to swap. Delicate handmade clay, slate, or heritage tiles need careful handling and like-for-like sourcing.
- Weather: Work only in dry, calm conditions. Wet tiles are slippery and gusts can be dangerous.
If any of the above means you don’t feel 100% comfortable, don’t risk it. LD Roofing Services Ltd can inspect, source matching tiles, and make a robust repair with minimal fuss.
Tools and materials you’ll need
If you’re comfortable proceeding, gather everything before you start.
- Roof ladder with ridge hook or properly footed access ladder
- Fall protection where appropriate, plus non-slip footwear and gloves
- Pry bar or slate ripper (for older fixings)
- Hammer or cordless screwdriver
- Replacement tiles that match the profile and colour
- Copper or galvanised nails, or clips if your system uses them
- Mortar or a compatible dry-fix component if ridge or verge tiles are involved
- Sealable bucket or pouch for old fixings
- Brush to clear debris
Pro tip from the LD Roofing Services team: Take one of your intact tiles to a merchant to ensure you match the exact profile. Even small profile differences can compromise weatherproofing.
Step-by-step: how to replace broken roof tiles
This is the practical bit. Take your time and keep movement slow and deliberate on the roof.
- Set up safe access
Secure your ladder on firm, level ground. Use a stabiliser or have someone foot it. Hook a roof ladder over the ridge so your weight sits on the rungs rather than the tiles. - Locate and inspect the damage
Don’t just swap the obvious broken tile. Check the surrounding area for hairline cracks, slipped clips, and any underlay damage. If you can see sunlight or pooled debris beneath, you may have a secondary issue to correct. - Lift the courses above
Most pitched roofs in the UK use overlapping courses. Carefully lift the two tiles directly above the broken one. Use wooden wedges or your gloved hand to hold them up slightly without stressing them. - Remove the broken tile
For interlocking tiles, slide the broken piece out from its nibs and out from under the overlaps. If it’s nailed, you’ll need to raise the overlapping tiles enough to get a pry bar in and gently withdraw or cut the nail. Avoid levering against neighbouring tiles. - Check the underlay and batten
Look for tears in felt or membrane and check the batten isn’t rotten or loose. Small membrane nicks can be patched with compatible tape. Rotten battens or widespread underlay damage is professional territory. - Fit the new tile
Slide the replacement tile into position, ensuring it hooks securely on the batten and locks into the interlocks on both sides. If the system is nailed or clipped, refix to the manufacturer’s guidance. Use copper or galvanised nails to resist corrosion. - Bed or clip ridge/verge components if needed
If the broken tile is sat near a ridge, verge or valley, you may need to reinstate mortar or a dry-fix component. Modern dry-fix systems clip and seal without mortar and are preferred for long-term performance. - Settle the course
Lower the lifted tiles gently back into place. Check for a continuous, even line with consistent headlap. Any tile sitting proud can invite wind-driven rain. - Final tidy
Brush away grit and dust, remove old fixings, and photograph the repair for your records or insurance.
That’s the core process of how to replace broken roof tiles safely and neatly.
Common mistakes to avoid when replacing broken roof tiles
- Walking on tile crown:. Always place weight near the lower third of the tile where it’s supported by the batten below.
- Mixing profiles: A near match isn’t good enough. Water and wind will find gaps.
- Skipping fixings: In exposed areas, tiles often require nails or clips. If the original tile was fixed, the new one should be too.
- Working in poor weather: Moisture and wind magnify risk so it is always best to reschedule if conditions turn.
When to call a professional
There’s no shame in getting help. Phone LD Roofing Services Ltd if:
- The roof is steep or above two storeys
- The damage is near a chimney, valley, skylight or solar array
- Multiple tiles are cracked, slipped or missing
- You suspect structural issues or water ingress in the loft
- You need urgent, weather-tight temporarying after a storm
Our teams are trained in safe access, can source exact-match tiles quickly, and will guarantee the repair.
Costs, insurance and speed
A single-tile swap is usually cost-effective, but prices vary by access, tile type and location on the roof. If the break resulted from storm damage, you may be able to claim on buildings insurance. We can provide a written report, photographs and a clear invoice to support a claim.
For vulnerable areas or repeated failures, we may suggest upgrading to a dry-fix ridge or verge system. It’s not just a nice-to-have. Dry-fix systems improve ventilation, resist wind uplift and reduce maintenance.
Newly qualified and wondering what’s next?
If you’ve recently achieved a roofing qualification and want to practise the essentials, broken tile replacement is a great early skill to master. Focus on:
- Identification and matching: Learn to recognise profiles quickly and order like-for-like replacements.
- Safe access: Get comfortable with roof ladders, harness checks and setting out exclusion zones below.
- Fixing methods: Nail and clip systems vary by manufacturer. Keep product datasheets handy and follow them to the letter.
- Documentation: Photograph before and after, note wind exposure zone, and record fixings used. Good paperwork builds client trust.
Why homeowners choose LD Roofing Services Ltd
- Fast, tidy repairs with matched tiles
- Expert advice on whether DIY is sensible or not
- Clear pricing with no surprises
- Support with insurance claims where applicable
- Workmanship guarantees and friendly, local service
Whether you just need guidance on how to replace broken roof tiles or you’d like us to handle the lot, we’re here to keep your home watertight.
Broken roof tiles overview
- Replacing a single broken tile is achievable for a careful DIYer on a low, accessible roof.
- Match the tile profile exactly, refix to the original method, and check the underlay while you’re there.
- Call LD Roofing Services Ltd for steep roofs, tricky details, multiple failures, or if you’re unsure at any point.
Do you think it’s time to bring in the professionals?
If you’ve taken a look at your roof and think it needs a repair but you don’t feel comfortable doing it yourself, don’t worry contact LD Roofing Services Ltd today by calling 01604 372453 or by filling in our online contact form. We will then help you decide the safest, most cost-effective route and get your roof back in shape swiftly and properly.